Apache Spark, Scala and Jupyter Lab Docker image
Git Link
Apache Spark is popular tool used in Big Data for processing large data at Parallel sequence. It support integration with multiple languages among which Scala and Python are main ones. In todays industries, it is used by almost every large scale company to format there data, perform ETL Operations, Data migrations and Machine Learning.
Other important tool, Jupyter is important and most popularly used with Python for Development and Deep Learning. The Availabilty to include Markdown and Code into single file make it ideal for POC and Testings.
Step 1: Installing Docker and Tools.
If not already installed, you can refer to instructions at docker site for you OS.
We will be building base image which will have Apache Spark, Scala and Python Installed and we will import the same base image to different images for our use.
First we will be building the Main Spark Master and then run another instance of Slave spark instance. We will run another Instance that will Run Jupyter lab server.
Step 2: Building the Base Image.
For our learning, we will be setting up everything from screth over debian base Image and setup basic variables and Make our shared Workspace.
1
2
3
4
5
6
7
8
9
10
11
12
13
14
FROM debian:stretch

# Adding Env Vairables which we will need later
RUN mkdir -p /tmp/logs/ && chmod a+w /tmp/logs/ && mkdir /app && chmod a+rwx /app && mkdir /data && chmod a+rwx /data
ENV JAVA_HOME=/usr
ENV SPARK_HOME=/usr/bin/spark-3.3.0-bin-hadoop3
ENV PATH=$SPARK_HOME:$PATH:/bin:$JAVA_HOME/bin:$JAVA_HOME/jre/bin
ENV SPARK_MASTER_HOST spark-master
ENV SPARK_MASTER_PORT 7077
ENV PYSPARK_PYTHON=/usr/bin/python
ENV PYTHONPATH=$SPARK_HOME/python:$PYTHONPATH
ENV APP=/app
ENV SHARED_WORKSPACE=/opt/workspace
RUN mkdir -p ${SHARED_WORKSPACE}
For first step, we will install Python=3.8 in debian along with some important dependencies. Since apt install python=3.6 by default, we will be installing Python from scratch.
We will also install Java-8 (openjdk-8-jdk) along with importany plugins.
1
2
3
4
5
6
7
8
9
10
11
12
13
14
15
16
17
18
19
20
#Install Python=3.8
RUN apt update && \
    apt install -y build-essential zlib1g-dev libncurses5-dev libgdbm-dev \
    libnss3-dev libssl-dev libreadline-dev libffi-dev libsqlite3-dev curl \
    wget libbz2-dev && \
    wget https://www.python.org/ftp/python/3.8.0/Python-3.8.0.tgz && \
    tar -xf Python-3.8.0.tgz && cd Python-3.8.0 && \
    ./configure --enable-optimizations && \
    make -j 8 && make altinstall && \
    cd .. && rm -rf ./Python-3.8.0* && \
    curl https://bootstrap.pypa.io/get-pip.py -o get-pip.py && \
    python3.8 get-pip.py && rm -rf ./get-pip.py && \
    pip3 install numpy scipy matplotlib && \
    rm -f /usr/bin/python && ln -s /usr/local/bin/python3.8 /usr/bin/python

# System packages
RUN apt-get clean && apt-get update -y && \
    apt-get install -y curl wget unzip procps openjdk-8-jdk coreutils && \
    rm -rf /var/lib/apt/lists/*
Now in the next process we can install latest Apache Spark and Scala in our base image. At time of writing Apache Spark had latest 3.3.0. For Scala, we will use 2.12.12 version.
1
2
3
4
5
6
7
8
9
10
11
12
13
14
15
16
17
18
19
# Install Spark
RUN curl https://dlcdn.apache.org/spark/spark-3.3.0/spark-3.3.0-bin-hadoop3.tgz -o spark.tgz && \
    tar -xf spark.tgz && \
    mv spark-3.3.0-bin-hadoop3 /usr/bin/ && \
    mkdir /usr/bin/spark-3.3.0-bin-hadoop3/logs && \
    rm spark.tgz

# Install Scala in Docker
ARG SCALA_VERSION=2.12.12
RUN mkdir -p ${SHARED_WORKSPACE}/data && \
    mkdir -p /usr/share/man/man1 && \
    curl https://downloads.lightbend.com/scala/${SCALA_VERSION}/scala-${SCALA_VERSION}.deb -k -o scala.deb && \
    apt install -y ./scala.deb && \
    rm -rf scala.deb /var/lib/apt/lists/*

# Setup Ammonium Inside Docker
RUN curl -L -o /usr/local/bin/amm https://git.io/vASZm && chmod +x /usr/local/bin/amm

VOLUME ${SHARED_WORKSPACE}
Step 2: Setting up Master Docker Image
Since we have already installed latest spark version in base image, we can directly start the Master spark container.
It will host the master node and divide the work among the slave containers.
1
2
3
4
5
6
7
8
9
10
FROM mk-spark-base

RUN mkdir -p ${SHARED_WORKSPACE}
VOLUME ${SHARED_WORKSPACE}

EXPOSE 8081 7077 8998 8888 8080

WORKDIR ${APP}

CMD /usr/bin/spark-3.3.0-bin-hadoop3/bin/spark-class org.apache.spark.deploy.master.Master >> /tmp/logs/spark-master.out
Step 3: Setting up Slave Docker Image
Once the Master is up, we can start the Slave instance for receiving instructions from master. For learning we will only start single Slave container but we can also start muliple of those based on work load. We generally use Applications like YARN to deploy and start the instances dynamically.
1
2
3
4
5
6
7
8
9
10
11
12
13
14
FROM mk-spark-base

RUN mkdir -p ${SHARED_WORKSPACE}

# Setting up Shared Volume
VOLUME ${SHARED_WORKSPACE}

# Opening the Ports
EXPOSE 8081 7077 8998 8888 8080

# Setting the Work Directory
WORKDIR ${APP}

CMD /usr/bin/spark-3.3.0-bin-hadoop3/bin/spark-class org.apache.spark.deploy.worker.Worker spark://${SPARK_MASTER_HOST}:${SPARK_MASTER_PORT} >> /tmp/logs/spark-worker.out
Step 4: Setting up Jupyter Lab
Finised with Spark, we can start with setting up Jupyter Lab.
It comes with support for Python, but to add support for scala, we will use Almond which is written over Ammonite. It allows to add kernels for Scala in Jupyter notebooks.
1
2
3
4
5
6
7
8
9
10
11
12
13
14
15
16
17
18
19
20
21
22
23
FROM mk-spark-base

# Python packages
RUN pip3 install wget requests pandas numpy datawrangler findspark jupyterlab pyspark spylon-kernel


# Installing Almond to add Compatiblity with Scala in Jupyter Lab
ARG SCALA_VERSION=2.12.12
ARG SCALA_KERNEL_VERSION=0.10.9

RUN apt-get install -y ca-certificates-java --no-install-recommends && \
    curl -Lo coursier https://git.io/coursier-cli && \
    chmod +x coursier && \
    ./coursier launch --fork almond:${SCALA_KERNEL_VERSION} --scala ${SCALA_VERSION} -- --display-name "Scala ${SCALA_VERSION}" --install && \
    rm -f coursier

ADD ./shared_storage/ ${SHARED_WORKSPACE}/

EXPOSE 8888

WORKDIR ${SHARED_WORKSPACE}

CMD jupyter lab --ip=0.0.0.0 --port=8888 --no-browser --allow-root --NotebookApp.token=
Step 5: Building Docker Images
Once finished with writing Docker Images, we can start with building Docker images for each of the file. We can add the following command to single file build.sh and execute the file with sh build.sh
1
2
3
4
5
6
7
mkdir ./shared_storage

 # Builds images
docker build -f base.Dockerfile -t mk-spark-base .
docker build -f master.Dockerfile -t mk-spark-master .
docker build -f worker.Dockerfile -t mk-spark-worker .
docker build -f jupyter.Dockerfile -t mk-jupyter .
Step 6: Building Compose file
Once completed with building the Images, we can write compose file to complete the setup. We will save it as docker-compose.yaml and add instuctions to run Jupyter Docker along Master and Slave Containers of Spark.
All the images will be sharing single shared storage that will make easier for them to exchange data.
1
2
3
4
5
6
7
8
9
10
11
12
13
14
15
16
17
18
19
20
21
22
23
24
25
26
27
28
29
30
31
32
33
34
35
36
37
38
39
version: "3.6"
volumes:
   shared-workspace:
    name: "hdfs-2"
    driver: local
services:
  jupyterlab:
    image: mk-jupyter
    container_name: mk-jupyter
    ports:
      - 8888:8888
    volumes:
      - shared-workspace:/opt/workspace
      - ./shared_storage/:/opt/workspace


  spark-master:
    image: mk-spark-master
    container_name: mk-spark-master
    ports:
      - 8080:8080
      - 7077:7077
      - 8998:8998
    volumes:
      - shared-workspace:/opt/workspace


  spark-worker-1:
    image: mk-spark-worker
    container_name: mk-spark-worker-1
    environment:
      - SPARK_WORKER_CORES=1
      - SPARK_WORKER_MEMORY=512m
    ports:
      - 8081:8081
    volumes:
      - shared-workspace:/opt/workspace
    depends_on:
      - spark-master
Once saved, we can start the Compose file with command docker compose up that will load the images and start the containers.
Started we can visit the Jupyter Lab and Apache Spark server over Ports 8888 and 8080 correspondly.
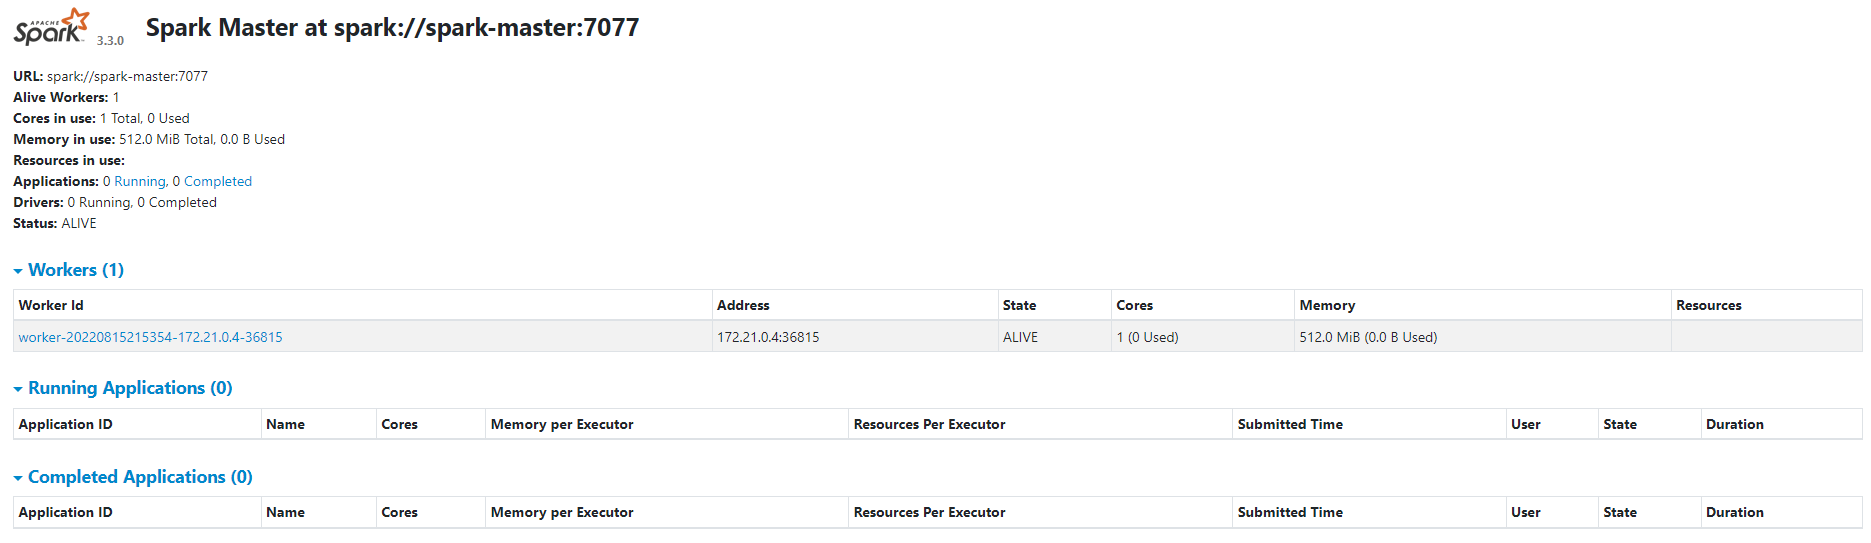 |
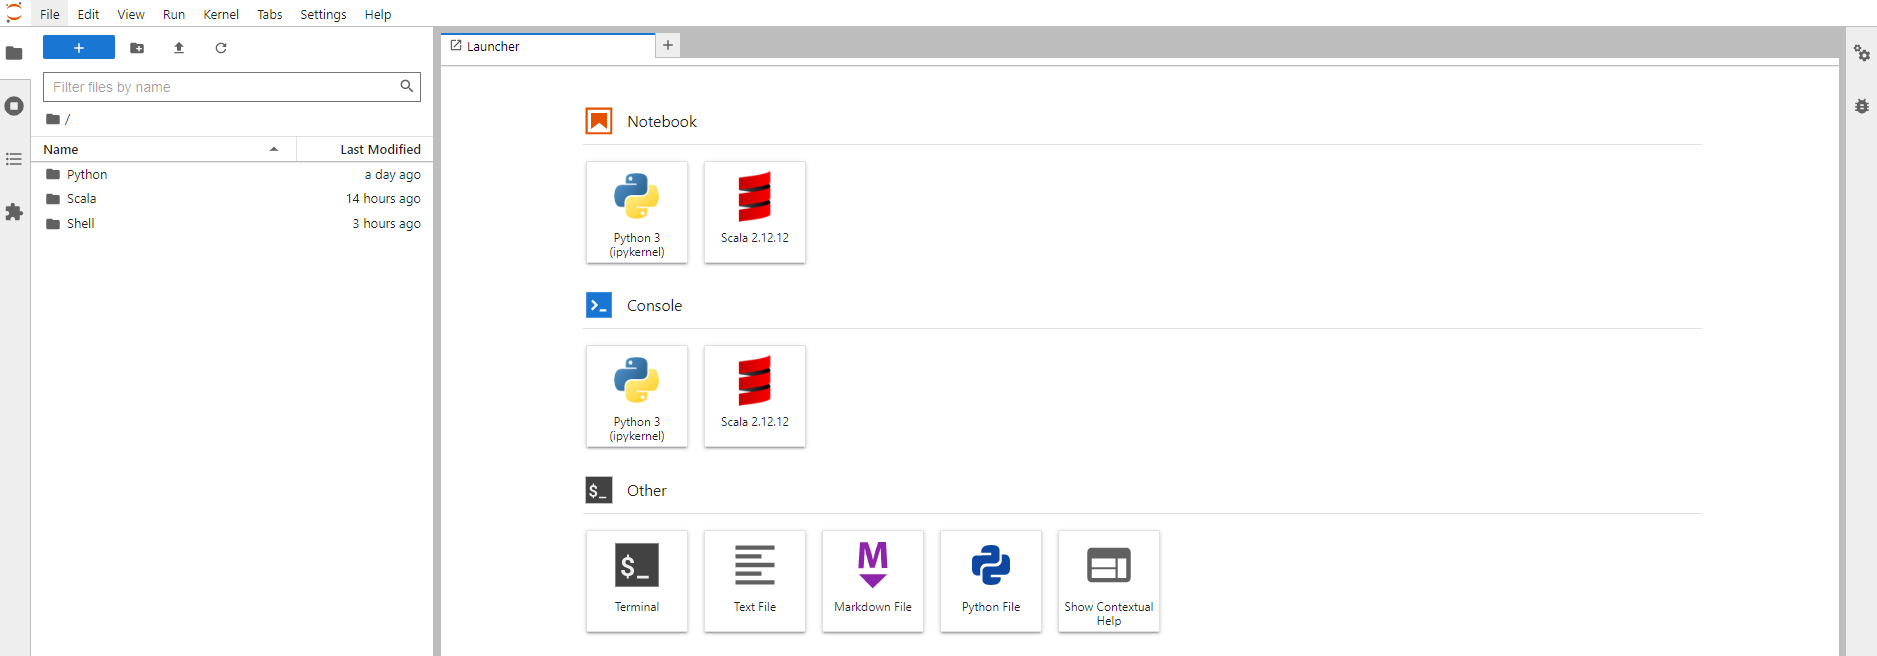 |
Once the Jupyter lab is running successfully, you can start building your code in Scala or Python inside Jupyter lab.
Updates
- Update 1: Python kernel is shifted to Miniconda for setting and running Jupyter-Lab
- Update 2: C++ Kernel is also added to Jupyter(By Default it is Commented but can be Uncommented to add C++ support) You can also refer to the following articles which helped me in the this process:
- https://www.stxnext.com/blog/docker-jupyterlab-apache-livy-rest-api-apache-spark/
- https://www.kdnuggets.com/2020/07/apache-spark-cluster-docker.html
- https://github.com/cluster-apps-on-docker/spark-standalone-cluster-on-docker
- https://www.youtube.com/watch?v=DLdJ4EFqkf8